The Portfolio feature on your profile offers a great opportunity to showcase your work to potential clients.
To add items to your Portfolio:
- Log in to your account
- Click "Edit profile" from your Dashboard
- Scroll down to your Portfolio section and click the "Add a Project" button:

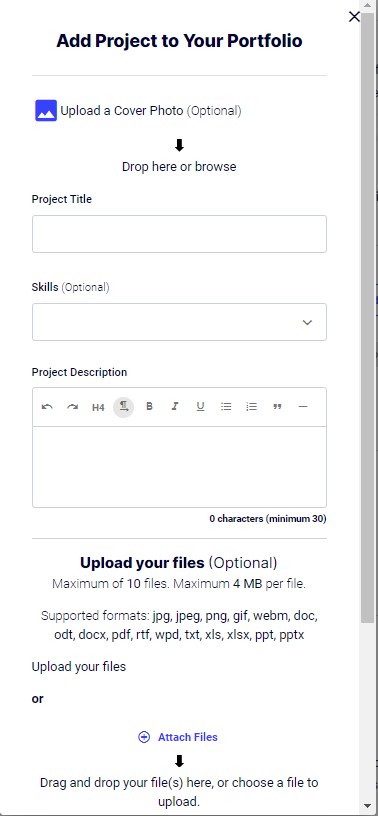
After clicking "Add a Project", you'll be presented with a form:
This form will allow you to attach a cover image, describe the Project and attach up to 10 files you'd like to showcase which are associated with the project:
The elements of the form labelled above include:
1. A cover image and the option to delete the cover image you've uploaded for the project.
The cover image is the image that will represent the project within the portfolio section of your profile. Cover images are optional but recommended to improve the aesthetic of your profile.2. A project title. We recommend that you use this to summarize the contribution to the project you made, which is being showcased - for example, "Graphic Design for a Christmas ad campaign".
3. Any relevant skills. If your work on the project demonstrated any specific skills, you may wish to select those skills from the skill menu.
4. A project description. This is where you'll provide more details about the project itself and how you contributed your skills to the project.
5. File attachments. You may select up to 10 files to attach to the project, including images, documents and presentations.
Each file must be no more than 4MB and the support file formats are: jpg, jpeg, png, gif, webm, doc, odt, docx, pdf, rtf, wpd, txt, xls, xlsx, ppt and pptx.
6. Video links. You may also embed videos into a project by providing either YouTube or Vimeo links to the videos you would like included. Please note that videos must be hosted on YouTube or Vimeo in order to be included in a project.
7. More videos. The "Add More Videos" link will provide you with the option to add additional video links to the project if you would like to include more than one video.
8. Publish. Once you're happy with everything on the form, click the "Publish Project" button to publish this project to your portfolio. This will allow potential clients to view the project within the portfolio section of your profile.
Once you click Publish, you'll be taken back to your profile, where you'll be able to see the new project:
If you choose not to include a cover image with your project, a placeholder image (such as the orange document, pictured in the above image on the left) will be used to represent the project.
When you hover your mouse over a project in the portfolio, an icon will appear in the top right corner of the project. Hovering your mouse over that icon will present you with the options to view, edit or delete:
Deleting will remove the project from your portfolio altogether, while editing will take you back to the same form you completed when you created the project.
If you click view, you'll be able to see the project as it is seen by clients who visit your profile:
The elements of the project labelled above include:
1. The project title you entered.
2. The cover image you provided.
3. The description you entered.
4. The skills you selected, if any.
5. Any documents or presentation files will be listed beneath the "Attachments" header. Clicking these file links will download the file.
6. Any image files will be embedded as images beneath the "Visuals" header.
7. Any videos you linked will be embedded beneath the "Videos" header.
